Use up those 2×4’s that are taking up space in your garage, or lingering around from your last project. We have compiled three simple DIY projects that will help you use up that old lumber and leave you with gorgeous and useful furniture pieces for your home.
Table of Contents[Hide][Show]
But, before we jump into it…
did you know that a 2×4 is not actually 2 inches by 4 inches?
A 2×4 is 1.5 inches by 3.5 inches. We know, we know… this is crazy information that is extremely useful to know and reminds us to always measure before beginning any project to find the TRUE dimensions.
Rustic Entryway Coat Rack

This coat rack is easy to make, creates more usable storage, and allows your creativity to shine through. Begin by deciding what length will work best for the space you intend on hanging your rack. Cut your 2×4 to your desired length. You will want to distress and paint your wood before attaching the hooks, so get distressing! Choose your favorite hooks and attach them to your wood. Complete this project by attaching sawtooth hangers to the back of your rack for a simple way to hang it on your wall.
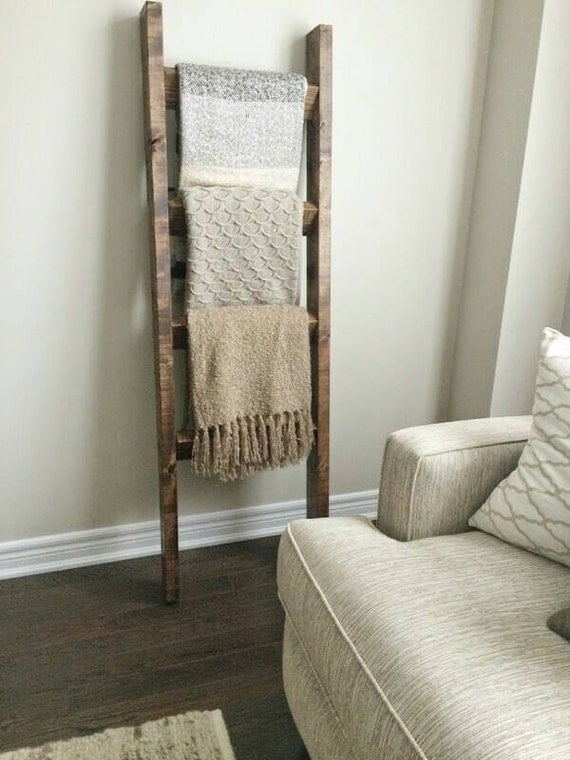
Custom Blanket Ladder

Create a unique storage piece that will double as awesome home decor. Plus, you can make this wooden blanket ladder for less than $10. Grab a couple 2×4’s from the nearest home improvement store (or use whatever is laying around the house), decide on your height and sizing, cut your pieces, and screw everything together. A miter saw will give you clean and precise cuts, but if you’re not ready to use a saw, you can purchase pre-cut lumber at most stores before bringing it home! Screw your horizontal planks (or “steps”) in on an angle for a leaning ladder effect or screw them in straight and lean your ladder a bit more. Either way looks great! Distress or stain your wood to give it that rustic look, or opt for some chalk paint to give your ladder that “shabby-chic” vibe.
Staggered Plank Coffee Table

That’s right… you can make your own coffee table to display in the living room and show off to all of your guests! Begin by cutting all of your 2×4’s to the length your table is going to be. Before piecing anything together, you will give the ends of each 2×4 a good sanding. The ends will be easier to reach before everything is pieced together. Next, begin creating your tabletop(s) by laying your 2×4’s down on a flat and level surface next to each other in a staggered formation. Use four or five planks for each row. You must create at least two tabletops to form the stacked effect, but you can also create three (as displayed in the linked photo above). Apply a line of wood glue between each piece and form together. Use extra long clamps to hold the planks together until the glue dries. For extra security, consider adding pocket holes.
Once the glue has dried, stack each tabletop on top of each other without glue to decide exactly where you want them to lay. Next, apply glue and adhere them into place. Apply clamps to ensure the are tightly pieced together as they dry. Once your top is completed, give it a good and thorough sanding with an electric sander or a sanding block. Distress, stain or paint your piece however you would like, and then attach some table legs. You can purchase premade table legs from home improvement stores for less than $4 per leg, or you can get creative and attach unique industrial legs to give your new furniture piece an edgy look. Remember that a standard coffee table is 15-17 inches tall.
Distressing Tips and Tricks

- Old and Worn Out Wood: Beat on the wood with a hammer to create dings and dents. Hammer in a few nails and pull them back out to make some holes in the wood. Focus on distressing the edges of your wood where dings would naturally occur. Use a grinder and wire wheel to create some deep crevices in the wood and add depth and dimension to your piece.
- Custom Staining: If you are hoping for a stain color that you cannot find, do not be afraid to make your own. Consider applying a brown stain, followed by an uneven coat of classic grey to give it a custom color and look. After staining your piece, lightly dry brush over it with a chalk paint. Use sandpaper or a steel wool pad to remove any of the chalk paint you do not want once it dries.
- Distressed Painting: Chalk paint works wonders for created a rustic or shabby chic custom piece. Layer your chalk paint over another color to sand through the chalk paint and revive the base color. Use creme wax to give your furniture an aged and distressed look.


Leave a Reply